

Lighting converts a static sign into a 24/7 communication asset. That single fact should drive every lighting decision you make, from the spec sheet you hand an electrician to the permit review you schedule before installation. The United States Sign Council Foundation frames it plainly: sign illumination exists to enable rapid, accurate message recognition by drivers managing multiple tasks at once. Get the lighting right, and your sign works around the clock. Get it wrong, and you’ve paid for a structure that disappears after dark.
Three business implications follow from that:
- Nighttime detectability. A well-lit sign extends the distance at which a driver or pedestrian can spot and read your message, directly affecting foot traffic and drive-by conversions.
- Safety and wayfinding. Proper illumination reduces the time a viewer needs to process your sign, which matters most at roadside locations where reaction time is measured in seconds.
- Energy and maintenance trade-offs. Lighting adds operating cost and maintenance obligations. The technology you choose determines how large those costs are and how often you deal with them.
Table of Contents
- What types of sign lighting should you use?
- How does lighting change what viewers see and feel?
- What specs should you demand from your sign designer?
- What do LED signs actually cost to run, and how long do they last?
- What regulations apply to sign lighting in the U.S.?
- Which lighting approach fits your sign type?
- How should you install and maintain sign lighting?
- What does the research actually say about sign lighting effectiveness?
- Key Takeaways
- What most clients get wrong about sign lighting
- Customsignstoday can spec and build your illuminated sign
- Useful sources and further reading
What types of sign lighting should you use?
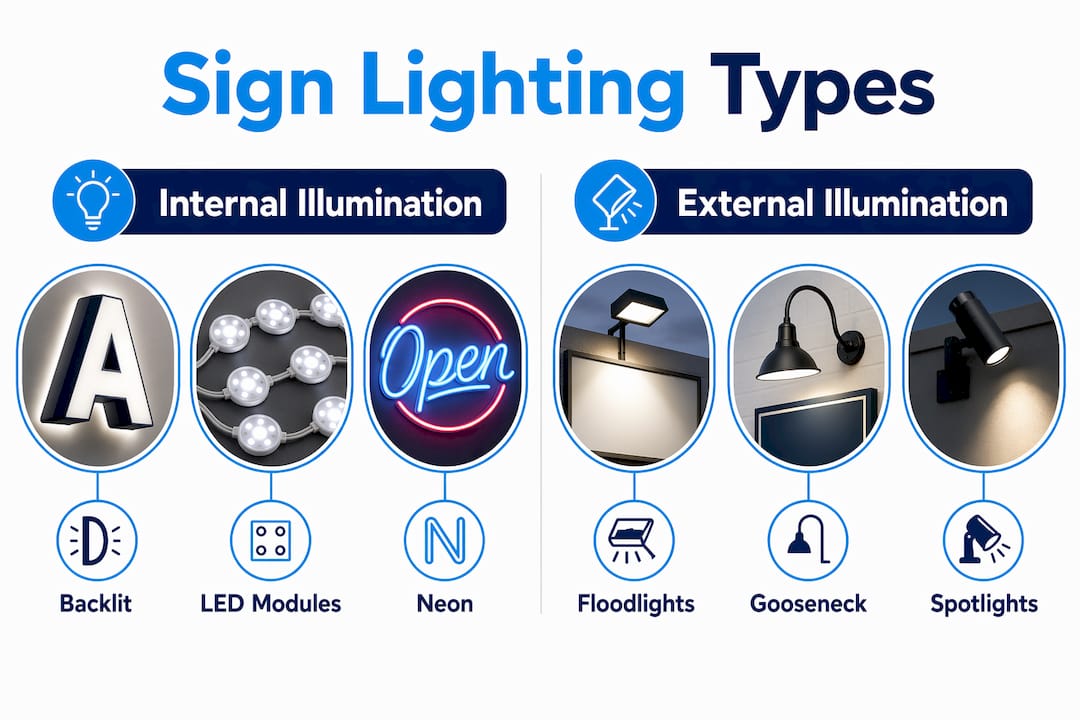
The right lighting method depends on your sign type, site constraints, local codes, and the visual effect you want. Each approach has a distinct performance profile.
| Lighting Type | How It Works | Best For | Key Trade-off |
|---|---|---|---|
| Internal/backlit | Light source inside the cabinet or letter face | Channel letters, lightboxes, cabinet signs | Highest visibility; may trigger local aesthetic restrictions |
| External flood/spot | Fixtures mounted above or below, aimed at the sign face | Monument signs, building fascia, masonry | Lower cost upfront; uneven coverage risk, light trespass |
| Halo/edge illumination | LEDs behind letters create a glow on the wall behind | Upscale retail, hospitality, interior lobbies | Dramatic look; lower legibility at distance |
| Neon (glass tube) | Electrified gas in shaped glass tubes | Bars, boutiques, vintage branding | High character; fragile, higher energy, limited dimming |
| LED modules/strips | Discrete LED arrays inside cabinets or channel letters | Nearly all sign types | Long lifespan, dimmable, energy-efficient; quality varies widely |
Pro Tip: If your location is on a roadside with a 35 mph or higher speed limit, prioritize internal or backlit illumination over external floods. The visibility gap between the two methods is measurable and significant, as the research below shows.
External floodlights and gooseneck fixtures work well for monument signs and building-mounted plaques where internal lighting is impractical or prohibited by local ordinance. The catch is that external sources can produce hot spots and uneven luminance across the sign face, and they tend to spill light onto adjacent property. Internal illumination, by contrast, distributes light from behind the face, which reduces spill light and improves uniformity when designed correctly.
Neon remains a legitimate choice for brand identity, but it is not a visibility tool for roadside detection. For neon sign aesthetics paired with modern efficiency, LED neon flex is now the practical alternative in most installations.
How does lighting change what viewers see and feel?
Brightness alone does not make a sign legible. What matters is the contrast between the sign’s luminance and the luminance of its background. A sign that glows at 500 candelas per square meter against a dark sky reads clearly. The same sign against a brightly lit urban backdrop may disappear entirely.
The Sign Research Foundation notes that higher luminance helps detection in visually complex environments, but excessive luminance or non-uniformity can reduce legibility and increase discomfort glare.
The detection distance advantage of internal illumination is not marginal. A real-world USSCF study found internally illuminated signs were visible at an average of 291 feet versus 173 feet for externally illuminated signs. At 35 mph, that 118-foot difference translates to roughly 2 extra seconds of reaction time. For a driver deciding whether to turn into your parking lot, 2 seconds is the difference between a customer and a missed opportunity.
Color temperature and color rendering index (CRI) shape brand perception in ways most business owners underestimate:
- Color temperature (Kelvin): Warm light (2700–3000K) reads as welcoming and traditional. Neutral to cool light (3500–4500K) reads as modern and clinical. Match the temperature to your brand personality, not just your preference.
- CRI: A CRI of 80 is the minimum for most commercial signs. For accurate logo color reproduction, specify CRI 90 or higher. A 70-CRI source can shift a red logo toward orange and a blue toward gray.
- Uniformity: Uneven illumination across a sign face draws the eye to bright spots rather than the message. Aim for a maximum-to-minimum luminance ratio no greater than 4:1 across the sign face.
Good sign design principles account for lighting from the start, not as an afterthought. Typography weight, letter spacing, and color contrast all interact with the light source.
What specs should you demand from your sign designer?
Technical specifications are where most business owners lose control of a project. Knowing the key metrics lets you ask the right questions and catch underspecified bids before installation.

| Metric | What It Measures | Practical Target |
|---|---|---|
| Luminance (cd/m²) | Brightness of the sign face | Varies by ambient; uniformity ratio ≤ 4:1 |
| Illuminance (footcandles / lux) | Light falling on the sign face | — |
| Beam angle | Spread of the fixture’s output | Match to sign width and setback distance |
| Color temperature (K) | Warm vs. cool appearance | 3000K for most retail applications |
| CRI | Color accuracy | ≥ 80 minimum; ≥ 90 for logo-critical applications |
| Light loss factor (Lf) | Accounts for dirt and lamp depreciation | Use Lf ≈ 0.8 in initial calculations |
The Alcon Lighting sign guide offers a practical rule of thumb for external fixtures: set the mounting distance from the sign face equal to the sign’s height for even coverage. Space multiple fixtures horizontally at approximately twice that setback distance. These ratios give you uniform illumination without excessive fixture count.
The light loss factor deserves special attention. A fixture that delivers 50 footcandles on day one will deliver significantly less after a year of dust accumulation and lamp depreciation. Using Lf ≈ 0.8 in your calculations means you’re designing for the real-world average, not the showroom spec.
Pro Tip: Ask your sign vendor for a photometric report before approving the design. This document shows predicted illuminance levels across the sign face and lets you verify that the proposed fixture meets your visibility and uniformity targets before a single hole is drilled.
What do LED signs actually cost to run, and how long do they last?
LEDs have changed the economics of sign lighting so substantially that the comparison with older technologies is almost unfair. But the numbers are worth stating clearly.
- Lifespan: Quality LED modules are rated for 50,000+ hours of useful life, compared to roughly 10,000–15,000 hours for fluorescent lamps and 2,000–5,000 hours for halogen sources.
- Energy use: LEDs typically use 50–75% less energy than fluorescent or neon equivalents for the same light output.
- Lumen maintenance: LEDs depreciate slowly. A well-specified module retains 70% of its initial output (L70) at the end of its rated life. Fluorescent lamps can drop to 60–70% output well before they fail.
- Maintenance intervals: With LEDs, a realistic maintenance cycle for cleaning and inspection is once or twice per year. Neon and fluorescent systems often require more frequent attention due to tube failures and ballast issues.
Dimming controls add upfront cost but pay back quickly. A sign that dims automatically after business hours or during low-ambient conditions uses less energy and extends module life. California’s Title 24 energy code mandates automatic shutoff and dimming controls for many sign types, and similar requirements are spreading to other jurisdictions.
Pro Tip: When comparing bids, ask each vendor for the LED module’s L70 rating and the driver’s rated hours. A module rated at 50,000 hours L70 with a matched driver is a fundamentally different product than one rated at 25,000 hours, even if the upfront price looks similar.
What regulations apply to sign lighting in the U.S.?
Regulatory requirements for sign lighting vary by municipality, but several patterns appear consistently across U.S. jurisdictions.
The USSCF recommends that Electronic Message Centers (EMCs) be dimmed to approximately 2%–8% of daytime brightness at night to remain safe and legible for drivers.
California’s Title 24 is the most detailed energy code for sign lighting in the U.S. It sets maximum lighting power allowances for internally and externally illuminated signs under the watts-per-square-foot compliance method. It also requires automatic shutoff or astronomical time controls for signs that operate continuously. Even if your project is outside California, these figures are useful benchmarks when evaluating bids.
Light trespass is the other major regulatory trigger. External fixtures that spill light onto neighboring properties or into residential windows generate complaints and, in many jurisdictions, code violations. Directional fixtures with sharp cutoff optics and physical shields reduce spill dramatically. Dimming schedules that reduce output after 10 PM or 11 PM address both energy codes and neighbor concerns simultaneously.
Before submitting a permit application, ask your local code official:
- Is there a maximum allowed luminance or footcandle level for this sign type and zone?
- Are dimming controls required, and if so, what control method is acceptable?
- Does the sign require UL or ETL certification for the lighting components?
- Are there setback or shielding requirements for external fixtures?
Pro Tip: Get the answers in writing. Code officials change, interpretations shift, and a written pre-application response protects you if the project is reviewed by a different official at permit issuance.
Which lighting approach fits your sign type?
Matching the lighting method to the sign type prevents the most common and expensive mismatches.
- Channel letters: Internal LED modules are the standard. Front-lit letters maximize legibility. Halo-lit (reverse channel) letters trade some legibility for a premium aesthetic, appropriate for hospitality and upscale retail. See illuminated channel letters for fabrication options.
- Cabinet signs and lightboxes: Internal fluorescent was the legacy standard; LED retrofit kits or purpose-built LED cabinets are now the norm. Specify even module spacing to avoid visible hot spots on translucent faces. Exterior lightbox signs are a cost-effective option for retail and service businesses.
- Pylon and monument signs: External floods or gooseneck fixtures work where internal lighting is impractical. Use fixtures with cutoff optics to minimize light trespass. For high-traffic roadside pylons, internally illuminated cabinet panels deliver better nighttime visibility.
- Awning signs: LED strip lighting under the awning valance provides ambient illumination and draws attention to the entrance. Avoid high-wattage sources that create glare for pedestrians at close range.
- Banners and temporary signs: Banners are not typically illuminated, but external uplighting or portable spotlights can extend their effective hours for events. Vinyl banners with retroreflective materials are a lower-cost alternative for short-term nighttime visibility.
- Vehicle graphics: No active lighting. Retroreflective vinyl and high-contrast color combinations are the tools here. Neon and LED accents on vehicles are subject to state motor vehicle codes and are restricted or prohibited in most states for moving vehicles.
The aesthetic vs. functional question comes down to viewing distance. At distances over 100 feet, legibility wins. Closer than 30 feet, brand character and visual appeal matter more because the viewer has time to process detail.
How should you install and maintain sign lighting?
Installation quality determines whether a well-specified lighting system performs as designed or fails within the first year.
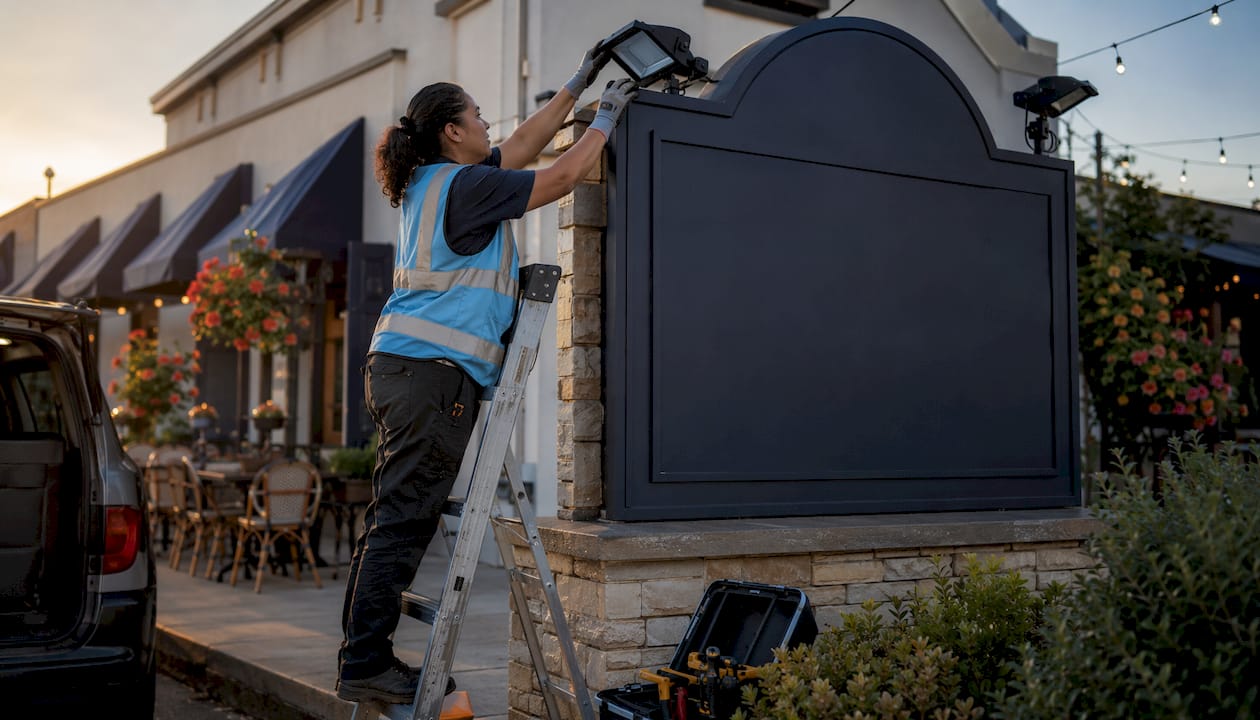
Site preparation is where shortcuts cause the most damage. Mounting substrates must be structurally sound enough to hold fixture weight through wind load. All penetrations for conduit and wiring require weatherproof sealing; water intrusion is the leading cause of premature LED driver failure. In-grade fixtures need drainage provisions to prevent standing water from entering the housing.
Aiming and shielding require physical adjustment after installation, not just calculation. Floodlights aimed too steeply create hot spots at the top of the sign face and underlit areas at the bottom. Walk the site at night after installation and adjust before the scaffold comes down. Physical barn doors or louvers on external fixtures control spill without reducing output on the sign face.
Pro Tip: Keep a lighting log for each sign location: installation date, module brand and model, driver specs, and any replacement dates. When a module fails three years in, that log tells you whether it’s a warranty issue or normal end-of-life, and it speeds up the reorder process significantly.
What does the research actually say about sign lighting effectiveness?
The United States Sign Council Foundation has produced the most rigorous industry-specific research on sign illumination in the U.S. Its findings are directly applicable to procurement decisions and permit appeals.
The USSCF’s core position is that sign illumination serves a safety function, not just a marketing one. Lighting enables rapid message recognition while drivers are simultaneously managing steering, speed, and traffic. A sign that requires extra processing time is a sign that causes drivers to brake suddenly or miss a turn.
That 2-second figure is not abstract. At 35 mph, a vehicle travels about 51 feet per second. Two seconds is 102 feet of additional stopping or decision distance. For a business on a busy commercial corridor, that margin is the difference between a customer who turns in safely and one who passes.
The USSCF also addresses luminance measurement: sign brightness should be evaluated in candelas per square meter (cd/m²), not just in watts or lumens. Luminance is what the viewer’s eye actually perceives, and it accounts for the sign face material’s reflectance and transmittance, not just the raw output of the light source.
Pro Tip: When appealing a permit denial based on brightness concerns, cite the USSCF Guideline Sign Lighting Standards. The document provides luminance targets and measurement methodology that regulators can apply consistently, which is more persuasive than a general argument about visibility needs.
Key Takeaways
Lighting is the single variable that most directly determines whether a sign works after dark. Specify it with the same rigor you apply to the sign face design.
| Point | Details |
|---|---|
| Internal illumination wins on visibility | Internally lit signs are detectable at 291 ft vs. 173 ft for external, giving drivers ~2 extra seconds at 35 mph. |
| Contrast matters more than brightness | Luminance contrast with the background drives legibility; excessive brightness can reduce it and create glare. |
| Use Lf ≈ 0.8 in calculations | A light loss factor of 0.8 accounts for dirt and depreciation so your sign meets targets over its full service life. |
| Dimming controls are often required | EMCs should dim to 2%–8% of daytime output at night; energy codes like Title 24 mandate automatic controls for many sign types. |
| Customsignstoday delivers full-spec illuminated signs | Customsignstoday provides internally illuminated cabinets, channel letters, and photometric documentation for business owners who need compliant, high-visibility signage. |
What most clients get wrong about sign lighting
The most consistent mistake is treating brightness as the goal. A client approves a sign, the fabricator installs the brightest available LED modules, and six months later the business receives a complaint from the municipality or a neighboring tenant. The sign is technically “bright,” but it is not performing well because the luminance is non-uniform, the color temperature clashes with the storefront’s interior lighting, and there are no dimming controls.
The second common error is mismatched color temperature. A business with warm, amber interior lighting installs a 5000K cool-white sign above the entrance. The sign looks disconnected from the brand experience, and the color rendering shifts the logo colors enough that customers notice something feels off, even if they cannot name it.
At Customsignstoday, the first site visit typically covers three things: ambient light levels at the sign location (measured at dusk), the existing electrical infrastructure, and the local code requirements for the zone. That information drives the lighting specification before any fabrication begins. The deliverable is a photometric report and a written spec that the client can use in the permit application and in conversations with their property manager.
Customsignstoday can spec and build your illuminated sign
Illuminated signage done right requires more than choosing a bright LED module. It requires a lighting specification matched to your site, your brand, and your local code requirements.
Customsignstoday designs and fabricates internally illuminated cabinets and illuminated channel letters with photometric documentation included. Whether you need a roadside pylon that performs at 300 feet or a storefront sign that holds your brand colors accurately under any ambient condition, the process starts with a free site lighting consultation. Request your custom sign quote and get a specification you can take to your permit office and your electrician with confidence.
Useful sources and further reading
The sources below are the primary references for the research and design guidance in this article. Decision-makers can use them directly in permit applications, vendor RFPs, and regulatory conversations.
| Source | What It Covers | Use It For |
|---|---|---|
| USSCF National Sign Illumination Guideline Standards (2018) | Luminance measurement, EMC dimming, safety rationale | Permit appeals, vendor specs, regulatory conversations |
| USSCF Internal vs. External Illumination Real-World Study (2018) | 291 ft vs. 173 ft visibility data, reaction time analysis | Justifying internal illumination in permit or zoning reviews |
| Sign Research Foundation: Illuminated Sign Conspicuity | Luminance contrast, visual complexity, glare effects | Understanding why context affects sign performance |
| California Title 24 Sign Lighting Standards | Wattage limits, control requirements, compliance methods | Benchmarking energy code requirements outside California |
| Alcon Lighting: Sign Lighting Design Guide | Setback rules, beam angles, Lf calculations, fixture types | Photometric design and fixture selection |
| U.S. Department of Energy: LED Lighting | LED lifespan, efficiency, and technology overview | Evaluating LED claims from vendors |
| International Sign Association: Sign Lighting Advocacy | Regulatory landscape, advocacy resources, code summaries | Navigating local sign lighting ordinances |
If visibility is mission-critical for your location, request a photometric report and ask for luminance testing after installation. A report generated before fabrication is a planning tool. A test after installation is your proof that the sign performs as specified.

