

TL;DR:
- Ordering banners online involves selecting appropriate materials, preparing print-ready files, and choosing finishing options to ensure durability and proper display. Proper measurement, file formatting in CMYK, and proof approval are essential steps that separate successful orders from costly mistakes. Careful preparation and knowledge of environment-specific materials lead to high-quality banners that effectively promote your message.
Ordering banners online is the process of selecting materials, uploading print-ready artwork, and choosing finishing options to create custom banners that promote your message at events, storefronts, or trade shows. Providers like Staples and VistaPrint have made custom banner printing online faster than ever, with same-day pickup available at many locations. The process rewards preparation. Knowing your size, material, file format, and finishing needs before you click “order” separates a banner that works from one that wastes your budget.
How to order banners online: what you need to know first
Custom banner printing is a large-format print process that produces signage from digital files on vinyl, mesh, or fabric substrates. The term “large-format printing” is the industry standard for this category. Whether you’re buying custom banners online for a grand opening, a trade show booth, or an outdoor event, the workflow follows the same logic: define your specs, prepare your file, upload, proof, and pay.
The single most important decision you make before placing any order is choosing the right material for your environment. An indoor fabric banner at a corporate event and an outdoor vinyl banner at a street fair have completely different durability requirements. Getting this wrong costs you both money and credibility.
What materials and sizes should you choose when ordering banners online?
Material selection determines how long your banner lasts, how it handles weather, and how sharp it looks at a distance. Standard 13oz vinyl is the industry norm for general-purpose banners, with outdoor durability of 6 to 12 months. That range covers most seasonal promotions and recurring events without overspending on heavy-duty materials.
The table below compares the most common banner materials so you can match your choice to your use case.
| Material | Best for | Pros | Cons |
|---|---|---|---|
| 13oz standard vinyl | General indoor/outdoor use | Affordable, widely available | Not ideal for high-wind areas |
| 15-23oz heavy-duty vinyl | Permanent outdoor signage | Extremely durable, weather-resistant | Higher cost, heavier to ship |
| Mesh vinyl | High-wind outdoor locations | Wind passes through, reduces tearing | Slightly lower print sharpness |
| Fabric (polyester) | Indoor events, trade shows | Premium look, wrinkle-resistant | Not weatherproof |
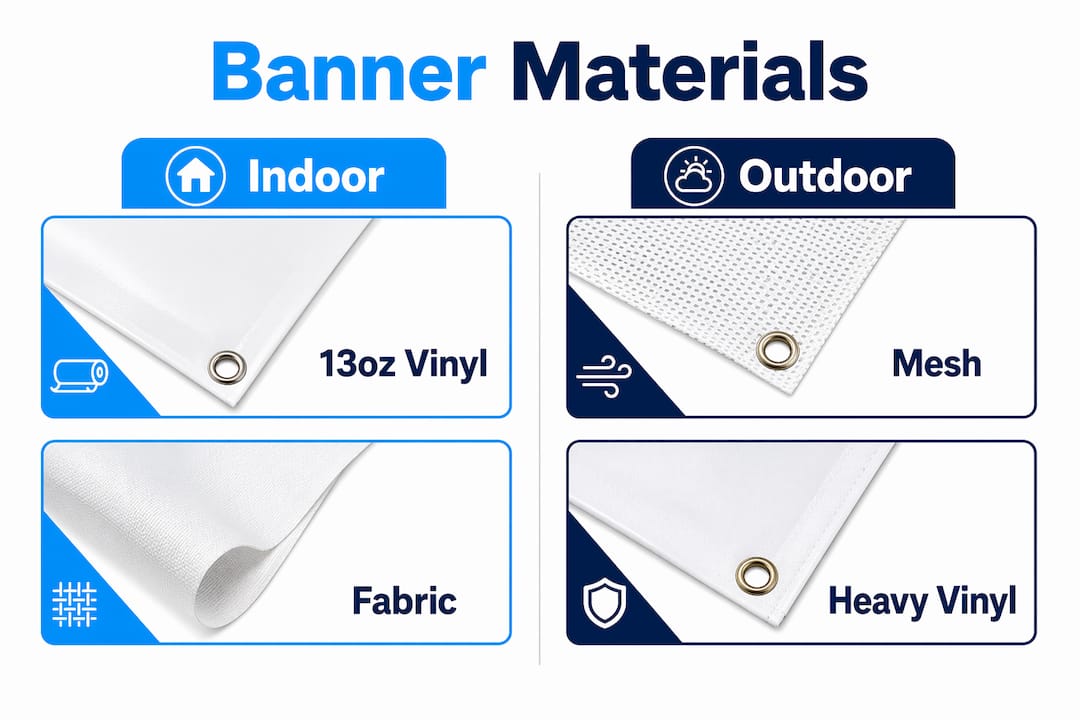
For outdoor banners in exposed locations, mesh or heavy-duty vinyl is the right call. Wind load is the primary killer of outdoor banners. A standard vinyl banner in a high-wind corridor will tear at the grommets within days.
Banner size directly affects readability. A general rule in large-format printing is that one inch of letter height is readable from roughly 10 feet away. A banner hung 50 feet from your audience needs text at least 5 inches tall. Verifying display area dimensions before ordering is the step most first-time buyers skip, and it is the most expensive mistake they make.
Pro Tip: Measure your display space in person before ordering. Bring a tape measure and note the exact width and height available, including any obstructions like door frames or ceiling fixtures.
How to prepare and upload your artwork files for successful banner printing
File preparation is where most orders go wrong. Print-ready files in formats like flattened PDFs, Adobe Illustrator (.ai), or EPS are the gold standard for banner printing. High-resolution TIFF and JPG files are acceptable for photo-heavy designs, but vector formats are always preferred for logos and text because they scale without quality loss.
Here are the technical requirements to check before uploading any file:
- Color mode: Convert artwork to CMYK before uploading. RGB is built for screens and produces dull, inaccurate colors when converted by a printer’s software. CMYK is the standard for physical ink on vinyl or fabric.
- Resolution: Large-format banners require 100 to 150 DPI at final print size. Higher resolution does not improve output at viewing distances but does inflate file size unnecessarily.
- Safe margins: Keep all critical text and logos at least 0.5 inches from any edge. Safe margin guidelines account for hemming and grommet placement so no content gets cut off or obscured during finishing.
- File size: Most providers cap uploads at 100MB. Flatten all layers and embed all fonts before exporting.
- Bleed area: Add at least 0.25 inches of bleed beyond the trim line so background colors extend fully to the edge after cutting.
Design software matters. Professional designers prefer Adobe Illustrator over automated online tools for precision work. Online design builders are convenient for simple layouts, but they often lack control over exact color values, kerning, and bleed settings. If your brand identity depends on precise color matching, use dedicated software and export a flattened PDF.
Pro Tip: Always request a digital proof before approving production. A proof catches color shifts, font substitutions, and layout errors that are invisible in your original file but obvious on a 4-foot banner.
For a deeper look at preparing files correctly, the guide on signage file preparation at Customsignstoday covers resolution, bleed, and color mode in detail.
Step-by-step process for placing an online banner order
The ordering workflow on most banner printing portals follows a predictable sequence. Understanding each step before you start prevents mid-order confusion and reduces the chance of selecting the wrong option.
- Choose your dimensions and quantity. Enter the exact width and height of your banner. Most portals price by square footage, so larger banners cost more per unit but often less per square foot at higher quantities.
- Select your material. Use the comparison table above to match material to environment. If the site offers a material guide, read it before defaulting to the cheapest option.
- Choose finishing options. Select hems, grommets, pole pockets, or rope loops based on how you plan to hang the banner. Finishing options like heat-welded hems and grommets are not cosmetic. Omitting them means your banner has no secure attachment point.
- Upload your artwork file. Use the file specifications from the previous section. Most portals display a live preview after upload. Check that text is sharp, colors look correct, and nothing is cropped.
- Review and approve the digital proof. Never skip this step. Artwork that is not print-ready delays production because the printer must either fix your file manually or send it back to you. Approving a clean proof locks in your design and starts the production clock.
- Select shipping or pickup. Ordering by 12:00 PM can qualify for same-day in-store pickup at providers like Staples. Express services that promise readiness in 3 hours or less carry additional fees. For non-urgent orders, standard shipping is the most cost-effective option.
- Complete payment and confirm your order. Save your order confirmation number. It is your reference point if you need to follow up on production status or request changes before printing begins.
Common mistakes to avoid when buying custom banners online
Most banner ordering errors are preventable. They cluster around four areas: measurement, file quality, finishing, and proof review.
- Wrong banner size. Incorrect measuring is the most costly mistake first-time buyers make. A banner that does not fit its display space is unusable, and most providers do not accept returns on custom orders.
- RGB files submitted instead of CMYK. Colors that look vivid on your monitor will print flat and muted if you forget to convert. This is a non-negotiable technical step.
- Low-resolution images. Stretching a 72 DPI web image to banner size produces visible pixelation. Always source high-resolution photos and graphics before starting your layout.
- Missing finishing options. Ordering a banner without grommets or a hem and then trying to hang it outdoors is a common oversight. Failing to select proper finishing results in a banner with no reliable attachment method.
- Design elements too close to edges. Text or logos placed within the bleed zone get cut off or hidden behind hems. Follow the safe margin rule without exception.
- Skipping the proof. A digital proof is your last chance to catch errors before ink hits vinyl. Rushing past it to save a few hours is rarely worth the cost of a reprint.
Pro Tip: Before placing your order, confirm exactly how and where the banner will be installed. Knowing whether it attaches to a fence, a pipe-and-drape system, or a wall determines which finishing options you actually need.
For design layout best practices, the resource on creating event banners at Customsignstoday covers spacing, hierarchy, and visibility in detail.
Key takeaways
Ordering custom banners online successfully requires matching material to environment, submitting print-ready files in CMYK at 100 to 150 DPI, selecting the correct finishing options, and approving a digital proof before production begins.
| Point | Details |
|---|---|
| Match material to environment | Use 13oz vinyl for general use, mesh or heavy-duty vinyl for high-wind outdoor locations. |
| Prepare files correctly | Submit flattened PDFs or vector files in CMYK at 100 to 150 DPI with safe margins applied. |
| Select finishing before ordering | Choose hems, grommets, or pole pockets based on your specific installation method. |
| Always approve a digital proof | Proofs catch color shifts, cropping errors, and font issues before production starts. |
| Measure your display space first | Incorrect dimensions produce unusable banners that most providers will not refund. |
Why preparation separates a great banner from a wasted order
I have reviewed hundreds of banner orders over the years, and the pattern is consistent. The buyers who are happy with their results are the ones who spent 20 minutes preparing before they ever opened a browser tab. They measured their space, converted their files to CMYK, and read the finishing options before clicking through the order portal. The buyers who are frustrated are almost always the ones who uploaded a logo from a website, skipped the proof, and chose the cheapest material without checking whether it was rated for outdoor use.
The online ordering process itself is not complicated. The platforms from providers like VistaPrint and Staples are genuinely well-designed. What trips people up is the assumption that the platform will catch their mistakes. It will not. A printer’s job is to reproduce your file accurately, not to fix it.
One thing I would push back on is the idea that online design tools are always good enough. For a simple text banner with a solid background, they work fine. For anything involving brand colors, complex layouts, or photographic elements, Adobe Illustrator or even Canva Pro with a proper CMYK export gives you far more control. The extra 30 minutes in a real design tool is almost always worth it.
The other underrated step is confirming your installation method before you order. I have seen businesses order 50 banners with pole pockets for an event that used pipe-and-drape systems requiring grommets. That is an entirely avoidable problem that a single conversation with the venue would have solved.
— Yossi
Get your custom banners printed right with Customsignstoday
Customsignstoday produces custom banners in vinyl, mesh, and fabric with a full range of finishing options including heat-welded hems, metal grommets, and pole pockets. Every order includes expert review of your artwork file and a digital proof before production begins, so you are not guessing about color accuracy or layout. Whether you need a single event banner or a bulk order for a multi-location promotion, Customsignstoday handles the technical details so you get a finished product that installs cleanly and looks sharp. Explore the custom banner printing services at Customsignstoday and request a free quote today.
FAQ
What file format is best for ordering banners online?
Flattened PDFs and vector formats like .ai or .eps are the best file types for banner printing. High-resolution TIFF or JPG files are acceptable for photo-based designs, but vector files are preferred for logos and text.
What resolution do I need for a custom banner?
Large-format banners require 100 to 150 DPI at final print size. Higher resolution does not improve visible quality at normal viewing distances but significantly increases file size.
How do I choose the right banner size?
Measure your display space in person before ordering. A general industry rule is that one inch of letter height is readable from approximately 10 feet away, so scale your text size to match your audience’s distance from the banner.
What finishing options do I need for an outdoor banner?
Outdoor banners require heat-welded hems and metal grommets at minimum. Industry-standard grommets and hems provide secure attachment points and prevent tearing at the edges when the banner is exposed to wind and weather.
Can I get a banner printed the same day?
Yes, providers like Staples offer same-day in-store pickup when orders are placed by noon. Express services that promise readiness in 3 hours or less are available but carry additional fees.

