
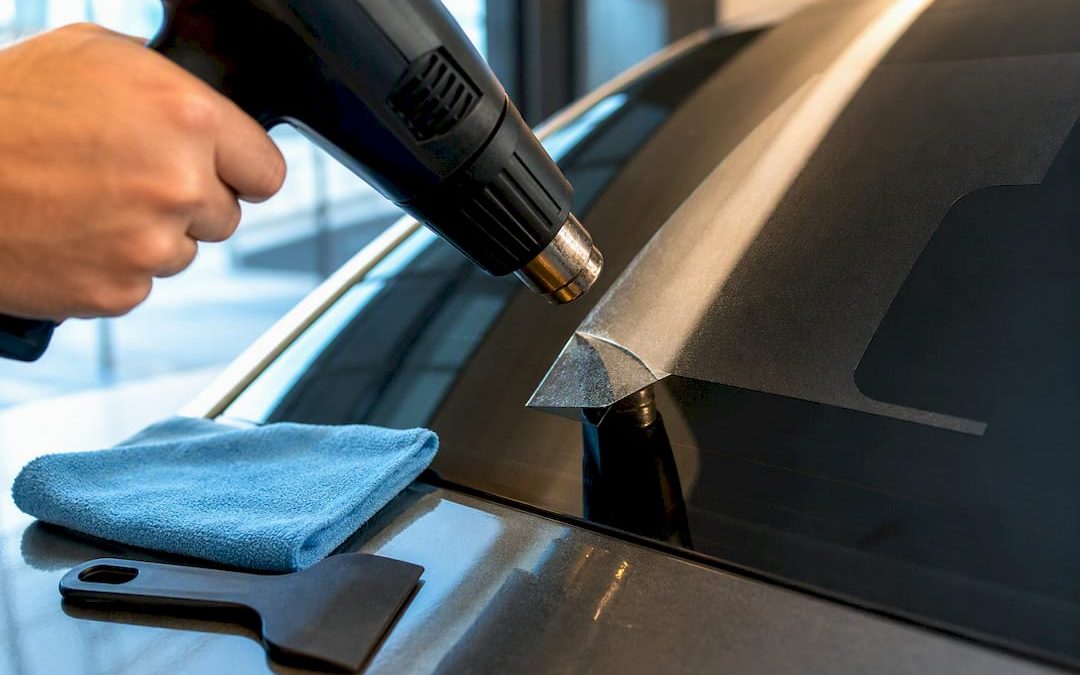
The fastest safe method is controlled heat plus a plastic scraper: warm the decal with a hairdryer for some time, lift a corner with a plastic edge, then peel at a low angle. Clean the leftover adhesive with isopropyl alcohol or a citrus-based remover. Skip metal blades on tinted glass, and stop immediately if the film starts lifting or the glass shows a chip.
TL;DR:
- Heating the decal with a low-heat hairdryer softens the adhesive enough for safe peeling, especially on older or sun-baked stickers.
- Use a plastic scraper and gentle, low-angle peeling to avoid scratching glass or damaging tinted surfaces; never force stubborn decals.
- It’s safest to apply solvents like isopropyl alcohol, citrus removers, or commercial adhesive removers with a cloth, avoiding direct spraying and protecting seals and trims.
- For new, lightly bonded decals, warm soapy water or penetrating oils can be effective, while older, sun-aged stickers often require a combination of heat and specialist removers.
- When dealing with tinted windows or delicate surfaces, apply heat from outside the glass and stop immediately if the tint starts lifting or bubbling.
Table of Contents
- Tools and Safety Checklist Before You Start
- Heat, Lift, and Peel: The Step-by-Step Removal Method
- Soapy Water, WD-40, and Commercial Removers: When to Skip the Heat
- Getting a Streak-Free Finish After Decal Removal
- Tinted Windows and Delicate Surfaces: Do This, Not That
- Razor Blades and Eraser Wheels for Stubborn Decals
- Signage Pro Tips: Why Professionals Remove Decals Differently
- When to Stop and Call a Professional
- Patience Beats Speed Every Time
- Get Professional Decal Removal and Replacement From Customsignstoday
- Sources
Tools and Safety Checklist Before You Start
Grab a hairdryer or low-heat gun, a plastic scraper (an old credit card works fine in a pinch), microfiber towels, isopropyl alcohol, a citrus-based adhesive remover, and a can of WD-40 for backup. Gloves and eye protection matter more than people think, especially once you introduce a razor blade into the mix later on.
Before touching the decal, rinse the window with soapy water to clear road grit. That grit is the real enemy here, not the decal itself. Dragging a scraper across sand or dust particles is what causes the fine scratches drivers notice weeks later under direct sun. Ammonia-free glass cleaner guidance points out that flooding the surface with soapy water lets a blade glide instead of grind, which cuts scratch risk dramatically compared to scraping dry.
Run through this list before you pick up anything sharp:
- Hairdryer or heat gun (low setting only)
- Plastic scraper or expired credit card
- Isopropyl alcohol (70% or higher)
- Citrus-based adhesive remover
- WD-40 as a backup penetrant
- Microfiber towels, gloves, and eye protection
- Ammonia-free glass cleaner for the final pass
Also check the glass itself for pre-existing chips or cracks near the decal edge. Heat expands glass unevenly, and a hairline crack near the sticker can spread if you concentrate warm air on one spot too long.
Pro Tip: Test any solvent on a hidden corner of the glass or trim first. Some citrus removers can haze certain plastic trims, and you want to find that out on an inch of bezel, not the whole window.
Heat, Lift, and Peel: The Step-by-Step Removal Method
This sequence works for the majority of factory decals, dealer stickers, and parking permits stuck directly to bare glass. It’s the same order Jalopnik recommends: soften first, lift second, never force it.
- Wash the area. Wipe down the decal and surrounding glass with soapy water and dry it. This removes grit before any tool touches the surface.
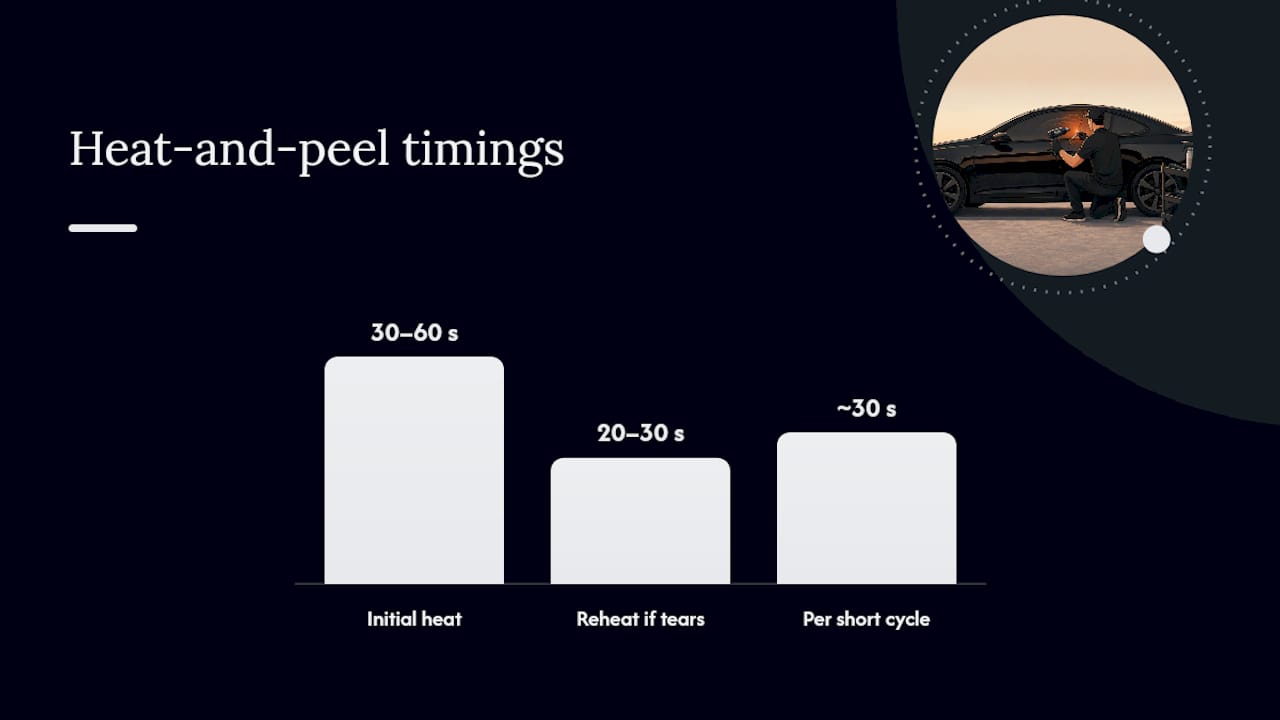
- Apply heat. Hold the hairdryer several inches from the decal and sweep it back and forth for 30 to 60 seconds. If you’re using a heat gun, keep it on the lowest setting and keep it moving constantly. Heating the adhesive to a moderate warm temperature is usually enough to soften it without stressing the glass.
- Find a corner. Slide the plastic scraper or credit card under one edge. Don’t dig in. You’re looking for the first half inch to lift cleanly.
- Peel at a low angle. Once you have a corner up, pull the decal back on itself at a shallow angle rather than straight up off the glass. A steady, slightly quicker pull once the edge is secure tends to carry the adhesive away with the vinyl instead of leaving it behind on the glass.
- Reheat if it tears. If the decal shreds partway through, stop pulling. Reheat the remaining section for another 20 to 30 seconds and resume from a fresh corner. Forcing a cold, stiff edge is what causes it to snap into confetti.
- Clean the residue. Once the decal is off, apply isopropyl alcohol to a cloth and wipe the sticky outline in gentle circular motions.
- Polish. Finish with an ammonia-free glass cleaner to remove any oily film the solvent left behind.
The most common mistake is skipping straight to force. A cold decal on a cold window barely moves, and dragging a scraper against that resistance is exactly how you scratch glass or nick paint on an adjacent trim strip. Heat is what does the actual work. The scraper and your hand are just there to guide the peel once the adhesive gives up.
Professionals also tend to apply solvent to a cloth rather than spraying it directly onto the glass, according to Pine Country Windows. Direct spraying lets liquid run down into window seals and door trim, where it can sit and cause discoloration over time. A damp cloth gives you the same cleaning power with none of the drip risk.
Pro Tip: If a decal has been baked on by years of sun exposure, run two or three short heat cycles rather than one long one. Thirty seconds of heat, a peel attempt, another thirty seconds, and so on keeps the glass from overheating in one spot while still softening stubborn old adhesive.
Soapy Water, WD-40, and Commercial Removers: When to Skip the Heat
Heat isn’t always the right first move. Fresh stickers, parking permits, and lightweight decals that haven’t had years to bond often come off with nothing more than warm soapy water and patience. Soak a towel, lay it over the decal for a few minutes, then peel. It’s slower than a hairdryer but gentler, which makes it the better choice on interior glass where you’re worried about trim or defroster lines.
WD-40 and similar penetrating oils work differently. Spray a light coat directly on the decal, let it sit for 5 to 10 minutes, then wipe and peel. The oil works its way under the vinyl and breaks the adhesive bond from below rather than softening it with heat. It’s a good option for decals stuck near rubber seals or defroster wires, where you’d rather not point a heat gun.
Commercial adhesive removers sit a step above household options. 3M’s Adhesive Remover is built specifically to strip leftover glue from glass and painted surfaces without abrasive scrubbing, which makes it a solid pick for stubborn, ghosted residue that alcohol alone won’t touch. Citrus-based, d-limonene removers do something similar and tend to smell a lot better in an enclosed car.
- Warm soapy water: best for fresh, lightly bonded stickers
- WD-40 or penetrating oil: good near seals, wires, or defroster grids
- Citrus/d-limonene removers: strong on stubborn residue, low odor
- 3M-style commercial removers: formulated for glass and paint without scraping
For anything sun-baked for multiple summers, combining methods usually beats picking just one. Heat the decal first to break the initial bond, then follow with a commercial remover on whatever film is left behind. That one-two punch handles the toughest jobs better than either method alone.
Getting a Streak-Free Finish After Decal Removal
Once the decal itself is gone, you’re usually left with a ghost outline of tacky adhesive. Start mild. Isopropyl alcohol at 70% or higher handles light residue well and evaporates cleanly without leaving an oily film behind, which makes it the right first choice before you reach for anything stronger.
If the alcohol isn’t cutting it, step up to a citrus-based remover or a 3M-style commercial product. Apply either one to a cloth rather than spraying it straight onto the glass. Let it sit for 30 to 60 seconds so it actually breaks down the adhesive, then wipe in small circular motions rather than long streaks, which tend to smear residue instead of lifting it.
Watch your seals and trim during this step. Oversaturating a cloth and letting solvent run into the window channel is how you end up with a rubber seal that goes brittle months later.
- Apply solvent to the cloth, never directly on the glass
- Let it dwell 30 to 60 seconds before wiping
- Work in small circles, not long streaks
- Keep solvent away from rubber seals and trim edges
The final step is the one most people skip: a proper glass polish. Solvents, even mild ones, often leave a faint oily haze that’s invisible until sunlight hits the windshield at the wrong angle and you suddenly see smears everywhere. An ammonia-free glass cleaner and a fresh microfiber towel clear that film in one pass. If a solvent leaves an especially greasy residue, a quick wipe with plain water and a drop of dish soap before the glass cleaner will cut through it.
Tinted Windows and Delicate Surfaces: Do This, Not That
Tint is a thin film laminated to the interior side of the glass, not the glass itself, and that distinction changes everything about how you should approach removal. Aggressive solvents, metal razor blades, and prolonged high heat can cloud, bubble, or peel that film in seconds, and unlike bare glass, tint damage usually means a full replacement rather than a quick fix.
The safer approach flips the usual order. Apply heat from the outside of the glass rather than directly onto the tinted side, and peel any decal that’s on the film gently, using soft plastic tools instead of a blade. Steam works well too, since it softens adhesive without the scorching risk of direct heat guns held too close.
- Heat from the exterior glass side, not the tint side
- Use steam or a hairdryer on low, kept moving constantly
- Test on a small hidden corner before committing to the whole decal
- If the film starts to lift or bubble, stop immediately
Pro Tip: If your tint is already a few years old and feels slightly bubbled or discolored near the edges before you even start, assume it’s fragile. Old, sun-stressed tint fails faster than fresh film, and it’s not worth risking a full re-tint job to save $10 on solvent.
If the tint is already failing on its own, from age rather than your removal attempt, that’s a sign to call a tint shop rather than keep working at it yourself.
Razor Blades and Eraser Wheels for Stubborn Decals
Razor blades work, but only on bare, untinted glass, and only with constant lubrication. Flood the area with soapy water first, hold the blade at a shallow 15 to 20 degree angle, and push forward in one direction rather than scraping back and forth. Wipe the blade every few strokes. Grit trapped under a dry blade is the single biggest cause of scratched windshields, far more than the blade itself.
Eraser wheels, sometimes sold under names like the Whizzy Wheel and used with a drill adapter, strip sun-baked vinyl fast and are popular with detailers for that reason. They also throw off a fine cloud of rubber and adhesive dust, so a mask and eye protection aren’t optional here. Keep the wheel moving and away from painted edges. Sitting one in place too long, especially near a painted trim strip, can burn through clear coat.
Practiced detailers use a 30 to 45 degree angle and a controlled, faster pull once a decal’s edge is secure, letting the adhesive fail on the vinyl side instead of sticking to the glass.
If you notice fine scratches forming, or tint starting to lift anywhere near your work area, put the blade down. That’s the point where DIY savings stop being worth the risk of a full glass or tint replacement.
Signage Pro Tips: Why Professionals Remove Decals Differently
At Customsignstoday, we install and remove vinyl decals daily, and the biggest difference between a clean job and a messy one usually comes down to patience with heat rather than any special tool. Signage-grade vinyl ages in predictable stages: it gets brittle at the edges first, then the adhesive itself hardens under UV exposure. Controlled heat followed by mechanical finishing, rather than one aggressive pull, produces the cleanest edge every time.
A few habits worth borrowing from the trade:
- Work in the shade or a garage. Direct sun makes vinyl brittle and adhesive gummy at the same time, which is the worst combination.
- Mask off nearby trim and dashboard plastics with painter’s tape before applying any solvent.
- Keep both a mild solvent (alcohol) and a stronger one (citrus remover) on hand rather than committing to just one.
- If you plan to reapply the decal somewhere else, lift it slowly enough to keep the backing intact, and lay it adhesive-side-up on wax paper immediately after removal.
Adhesive vinyl behaves differently depending on the surface it’s bonded to, and understanding how it releases from glass versus fabric or metal helps explain why the same solvent that works great on a windshield can underperform on other materials.
When to Stop and Call a Professional
Certain signs mean it’s time to put the tools down. Tint that’s bubbling or lifting, any new chip or crack near the decal, or adhesive that’s stayed sun-baked and stubborn through multiple heat and solvent attempts are all reasons to call a shop rather than keep pushing. Local detailing guides echo the same escalation order: start simple, add heat or solvent only as needed, and recognize when you’ve hit the ceiling of what’s safe to do yourself.
Professionals bring specialized heat tools and glass-safe solvents that go beyond what’s in a home garage, plus the ability to repair minor damage if something does go wrong. Before you call one, snap a few photos of the decal, note roughly how long it’s been on the glass, and mention whether the window is tinted. That context saves time on both ends.
Patience Beats Speed Every Time
Most decal removal failures come down to rushing the heat step or skipping it altogether. Glass and tint don’t reward force, they reward warmth and time. If you’re even slightly unsure whether you’ll want that decal again, take thirty seconds to photograph its exact placement before you touch it. That single habit has saved more people a second trip to the sign shop than any tool on this list.
— Yossi
Get Professional Decal Removal and Replacement From Customsignstoday
If your decal is sun-baked, sitting on tinted glass, or you’d rather not risk a scratch two days before a trade-in inspection, professionals can handle safe removal and replacement without the guesswork of a home solvent cabinet. Unlike a bottle of citrus remover and a credit card, our team works with the right heat tools and glass-safe solvents to lift old graphics cleanly, then can turn around and install fresh vehicle lettering or custom vinyl decals in the same visit.

We also handle face-change signage for businesses swapping out old graphics for updated branding, so the same removal expertise applies whether it’s a car window or a storefront panel. If you want a quote before committing to anything, request one here and describe the decal, the surface, and whether tint is involved. That’s enough for our team to recommend the right approach before a single tool touches your glass.
Sources
- How to remove stickers from car windows
- 3M™ Adhesive Remover product information
- How to Remove Stickers from Windows: 2026 Pro Guide
- Ways to remove stickers from windshield

