Installing business signage seems straightforward until permits get rejected, signs fall off walls, or inspectors shut down your project. Many business owners face costly delays and safety risks by skipping essential steps or underestimating installation complexity. This guide walks you through a proven process that ensures compliance, durability, and professional results from site survey to final inspection.
Table of Contents
- Prerequisites: What You Need Before Starting
- Step 1: Site Survey and Preparation
- Step 2: Permit Acquisition and Compliance
- Step 3: Sign Fabrication and Scheduling
- Step 4: Installation Day Procedures
- Step 5: Post-Installation Inspection and Maintenance
- Common Mistakes and Troubleshooting
- Expected Results, Timelines, and Costs
- Explore Professional Signage Solutions for Your Business
- Frequently Asked Questions
Key Takeaways
| Point | Details |
|---|---|
| Prerequisites Matter | Permits, proper tools, and compliance knowledge prevent 70% of common delays. |
| Site Survey Reduces Errors | Precise measurements and structural assessments avoid costly reinstallations. |
| PPE Prevents Injuries | Using personal protective equipment reduces injury risks by more than 50%. |
| Post-Installation Care | Regular inspections extend signage lifespan by 40% compared to neglected signs. |
| Permit Lapses Cost More | Skipping permits leads to fines averaging $500 to $5,000 and project stoppages. |
Prerequisites: What You Need Before Starting
Successful sign installation starts well before anyone picks up a drill. Understanding prerequisites saves you from scrambling midproject or facing legal penalties.
First, identify required permits. Sign permits vary dramatically by city and county. Some jurisdictions require building permits for larger installations, while illuminated signs often need electrical permits. Research your local zoning office requirements at least three weeks before your planned installation date.
Next, gather essential tools and equipment:
- Heavy-duty drills with masonry bits for concrete or brick surfaces
- Appropriate fasteners matched to your mounting surface and sign weight
- Extension ladders or scaffolding rated for worker weight plus tools
- Personal protective equipment including helmets, gloves, and safety glasses
- Levels, measuring tapes, and marking tools for precise placement
- Wire strippers and electrical supplies for illuminated signs
Understanding zoning laws protects your investment. Height restrictions, setback requirements, and illumination regulations differ widely. Some areas prohibit flashing lights or limit sign brightness near residential zones. Review your custom sign workflow early to align design with local codes.

Pro Tip: Schedule a brief consultation with your local building department before finalizing sign designs. Inspectors often provide invaluable guidance that prevents costly redesigns later.
Verify mounting surfaces can support your sign’s weight and wind load. Crumbling brick, rotted wood, or thin metal panels require reinforcement or alternative mounting locations. Clear debris from the installation zone and establish safety perimeters to protect pedestrians and workers.
Step 1: Site Survey and Preparation
A thorough site survey eliminates guesswork and prevents alignment disasters. Start by evaluating visibility from multiple customer approach angles. Walk your property from parking areas, sidewalks, and street views to identify optimal placement.
Follow these measurement steps:
- Mark the proposed sign center point using a reference landmark
- Measure height from ground level using a story pole or laser measure
- Record horizontal distances from building corners or property lines
- Document any overhead power lines, trees, or obstructions within 10 feet
- Photograph the location from multiple angles for permit applications
Assess mounting surface integrity carefully. Tap walls to detect hollow spots behind brick veneer. Check for water damage, cracks, or loose mortar. Metal buildings may require backing plates to distribute load. Masonry walls need proper anchors rated for pullout strength.
Secure your work zone before installation day. For outdoor signage installation, consider:
- Barricading sidewalks or parking spaces beneath the work area
- Posting warning signs about overhead work
- Coordinating with neighboring businesses about access disruptions
- Arranging temporary lighting for early morning or evening work
Document everything. Take detailed notes about electrical access points, existing conduit locations, and structural concerns. These records prove invaluable when coordinating with electricians or addressing permit questions. Pay special attention to retail sign placement factors like customer sightlines and competitor visibility.
For interior signage projects, verify ceiling joist locations and confirm adequate clearance for mounted signs. Test wall materials to determine appropriate fastener types.
Step 2: Permit Acquisition and Compliance
Permit delays derail more signage projects than any other factor. Obtaining required permits and complying with zoning laws greatly reduces the risk of installation delays and fines. Start this process immediately after finalizing your design.
Research specific permit requirements for your sign type and location. Monument signs typically need different approvals than wall-mounted signs. Illuminated signs trigger electrical permit requirements in most jurisdictions. Some cities require separate permits for structural modifications to building facades.
Submit applications early. Processing times range from one week to two months depending on your location and sign complexity. Include detailed drawings showing:
- Exact dimensions and mounting height
- Distance from property lines and rights of way
- Illumination specifications and electrical load calculations
- Structural details for mounting systems
- Material specifications and wind load ratings
Electrical codes demand strict compliance for illuminated signs. National Electrical Code (NEC) requirements cover wiring methods, circuit protection, and grounding. Local amendments may impose additional restrictions. Always engage licensed electricians for electrical work to ensure code compliance and safety.
Proactive permit compliance protects your business from stop-work orders that can add weeks to project timelines and thousands to costs.
Avoid common permit pitfalls by double-checking application completeness before submission. Missing signatures, incomplete drawings, or vague descriptions trigger rejections. Familiarize yourself with ADA compliance requirements if your signage includes directional or informational elements.
Confirm inspection schedules in advance. Some jurisdictions require multiple inspections at different installation stages. Missing scheduled inspections can delay final approvals and leave you operating under temporary certificates.
Step 3: Sign Fabrication and Scheduling
Coordinating fabrication with installation schedules keeps projects on track. Once permits are approved, provide your fabricator with final specifications and timeline requirements.
Review design proofs meticulously before approving production. Verify:
- Colors match your brand standards exactly
- Typography is sized for readability at viewing distances
- All copy is spelled correctly with proper punctuation
- Material selections suit your climate and exposure conditions
- Mounting provisions align with your installation plan
Schedule fabrication to allow buffer time for weather delays or permit issues. A typical timeline includes one to three weeks for production plus shipping time. Rush fees can add 20% to 50% to fabrication costs, so plan accordingly.
Pro Tip: Order signs during mild weather months when fabricators have more capacity and installers can work efficiently without weather interruptions.
Confirm tool and equipment availability well before installation day. Rental equipment like boom lifts or scaffolding may require advance reservations, especially during peak construction seasons. Verify your electrician’s schedule aligns with the installation date.
Maintain clear communication channels among all parties. Create a project timeline shared with your fabricator, installer, electrician, and property manager. Include contact information and backup plans for last-minute changes. Understanding how to order custom signs streamlines this coordination process.
Plan for contingencies like delivery delays or access issues. Keep flexible installation windows rather than rigid same-day schedules. Weather can ground aerial work or make adhesives ineffective, so maintain backup dates.
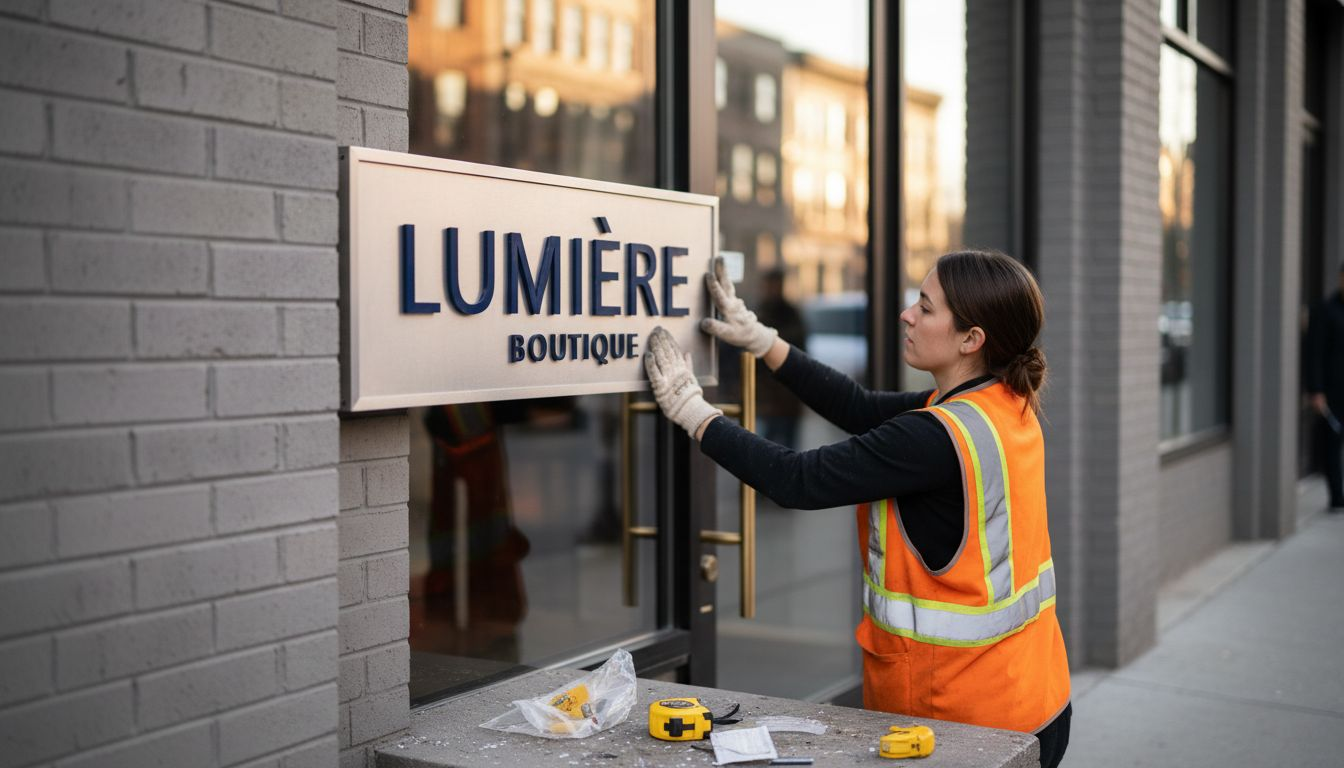
Step 4: Installation Day Procedures
Execution day demands careful attention to safety protocols and installation precision. Begin with a safety briefing covering hazards, emergency procedures, and team roles.
Follow this installation sequence:
- Establish safety perimeters with barricades and warning signage
- Verify all workers wear required PPE before starting
- Position and secure ladders or aerial equipment on level ground
- Transfer the sign to the work area using proper lifting techniques
- Mark final mounting points using templates or laser alignment tools
- Drill pilot holes appropriate for your fastener type and depth
- Install anchors or backing plates per manufacturer specifications
- Mount the sign with initial fasteners, checking level and alignment
- Complete all mounting hardware installation with proper torque
- Connect electrical components through licensed electrician work
Wearing PPE like helmets and gloves reduces installation injuries by over 50%. Never compromise on safety equipment to save time or money. Falls from ladders account for the majority of installation injuries.
Use manufacturer-recommended fasteners exclusively. Substituting cheaper or readily available alternatives compromises structural integrity. Concrete anchors must match hole diameter and embedment depth precisely. Wood substrates require lag bolts sized for adequate thread engagement.
Professional electricians must handle all wiring for illuminated signs to ensure code compliance and worker safety.
Test stability before declaring installation complete. Apply moderate pressure from multiple directions to verify secure mounting. Check that all fasteners are tightened uniformly without over-torquing that could crack sign faces or strip threads.
Maintain jobsite cleanliness throughout the process. Debris creates tripping hazards and projects an unprofessional image. Remove all packaging, fastener debris, and tools immediately after completion. Follow outdoor signage installation best practices for weather-specific considerations.
Step 5: Post-Installation Inspection and Maintenance
Thorough post-installation verification ensures your signage performs as intended for years. Begin inspections immediately after installation while workers are still onsite to address any issues.
Conduct these essential checks:
- Stability testing by applying pressure at multiple sign points
- Visibility assessment from all intended viewing angles and distances
- Electrical functionality including illumination uniformity and timer operation
- Alignment verification using levels on multiple sign axes
- Mounting hardware inspection for proper torque and secure connections
Clean the installation area completely. Remove drill dust, adhesive residue, and any marking materials from surrounding surfaces. This attention to detail demonstrates professionalism and protects your business reputation.
Educate yourself or designated staff on proper maintenance procedures. Most sign warranties require regular cleaning and periodic inspections. Provide documentation covering:
| Maintenance Task | Frequency | Method |
|---|---|---|
| Surface cleaning | Monthly | Mild soap and water, soft cloth |
| Fastener inspection | Quarterly | Visual check, retighten if needed |
| Electrical check | Quarterly | Test illumination, inspect connections |
| Structural assessment | Annually | Professional inspection recommended |
| Weather seal inspection | Annually | Check caulking and gaskets |
Schedule professional inspections annually to identify wear patterns, corrosion, or mounting degradation before failures occur. Early intervention prevents minor issues from becoming expensive replacements. Regular maintenance extends signage lifespan by 40% compared to neglected installations.
Maintain records of all inspections, repairs, and modifications. Documentation proves valuable for warranty claims, property sales, or permit renewals. Store photographs of the installation alongside maintenance logs.
Common Mistakes and Troubleshooting
Even experienced installers encounter challenges. Recognizing common errors helps you avoid or quickly resolve problems.
Incorrect placement causing misalignment happens when initial measurements lack precision or reference points shift. Fix this by using multiple reference landmarks and verifying measurements from different angles before drilling. Laser levels eliminate human error in horizontal and vertical alignment.
Wrong fasteners causing instability result from mismatching hardware to substrate materials or sign weight. Hollow wall anchors fail in solid masonry. Wood screws strip out of composite materials. Always consult load tables and use fasteners rated for at least three times your sign’s weight including wind loads.
Skipping permit acquisition leads to immediate stop-work orders and potential sign removal requirements. Fines range from $500 to $5,000 depending on jurisdiction severity. Apply for all required permits before purchasing materials or scheduling installation.
Ignoring electrical codes creates serious safety hazards including fire risks and electrocution dangers. Amateur wiring often lacks proper grounding, circuit protection, or weatherproofing. Licensed electricians ensure compliance and provide liability protection through bonding and insurance.
Regularly review local regulation updates that might affect existing signage. Some jurisdictions phase in stricter lighting restrictions or mandate sign updates during property transfers. Consult professionals when regulations seem unclear or conflicting interpretations emerge among city departments.
Expected Results, Timelines, and Costs
Understanding realistic project parameters helps you budget time and money appropriately. Typical signage installation projects span two to six weeks from initial planning through final inspection.
Timeline breakdown:
- Planning and design: 3 to 7 days
- Permit application and approval: 7 to 45 days
- Fabrication: 7 to 21 days
- Installation: 1 to 3 days
- Final inspection and approval: 1 to 7 days
Costs vary significantly based on sign size, complexity, and location. Budget for these typical ranges:
| Project Component | DIY Approach | Professional Service |
|---|---|---|
| Permit fees | $150 to $800 | $150 to $800 |
| Sign fabrication | $800 to $5,000 | $800 to $5,000 |
| Installation labor | $0 (your time) | $500 to $2,500 |
| Electrical work | $300 to $1,200 | $300 to $1,200 |
| Equipment rental | $200 to $800 | Included |
| Total investment | $1,450 to $7,800 | $1,750 to $9,500 |
Professional installation ensures permit compliance and typically includes warranties covering workmanship for one to five years. This protection reduces future repair expenses and provides peace of mind about structural integrity.
Properly installed signage delivers measurable business benefits. Customer surveys consistently show that quality exterior signage increases brand recognition by 60% to 80% within local markets. Visibility improvements drive foot traffic increases of 15% to 30% for retail locations.
Choosing professional services eliminates safety incident risks that could result in workers’ compensation claims or liability lawsuits. Licensed contractors carry insurance protecting your business from installation-related injuries or property damage.
Explore Professional Signage Solutions for Your Business
Navigating permits, coordinating trades, and ensuring code compliance takes specialized knowledge most business owners lack time to develop. Professional signage services handle every detail from design through installation.

Expert fabrication ensures your signs align perfectly with brand standards while meeting durability requirements for your specific climate and exposure conditions. Professional installers bring years of experience preventing the costly mistakes that plague DIY projects. From exterior lightbox signs to comprehensive retail signage solutions, experienced providers manage permit applications, coordinate electrical work, and guarantee compliant installations. Post-installation maintenance support protects your investment through regular inspections and prompt repairs. Complete office signage services deliver cohesive branding from exterior monuments through interior wayfinding.
Frequently Asked Questions
What permits are typically required for business signage installation?
Most jurisdictions require sign permits for exterior installations, with additional electrical permits needed for illuminated signs. Building permits may apply for large monument signs or structural modifications. Research your specific location’s requirements at least three weeks before planned installation since processing times vary significantly.
How long does a typical signage installation project take?
Complete projects typically span two to six weeks including permit approval, fabrication, and installation phases. Permit processing alone can take one to six weeks depending on jurisdiction complexity. Simple wall-mounted signs may install in a single day, while complex monument signs with electrical components require multiple days and inspection stages.
What safety measures are essential during installation?
Essential protective equipment includes hard hats, safety glasses, work gloves, and non-slip footwear. Using PPE like gloves and helmets reduces injury risk by more than 50%. Establish safety perimeters around work zones, secure ladders on level ground, and never work alone at heights. Licensed electricians must handle all electrical connections for illuminated signs.
How can I maintain my signage to prolong its lifespan?
Regular cleaning with mild soap and water prevents dirt buildup that degrades finishes. Inspect mounting hardware quarterly for loose fasteners and tighten as needed. Schedule annual professional inspections to identify corrosion, seal failures, or structural concerns before they require expensive repairs. Following manufacturer maintenance guidelines preserves warranty coverage and extends useful life by 40% or more.